 Sound Insulation
  Soundproofing
  Vibration Isolation
  Silent Ventilation
  Accessories
  Thermal & Acoustic Insulation
 On this page you will find our step-by-step plan for making a sound-insulating enclosure, or housing, for appliances and machines. You will find pictures and a review of a customer who has applied the step-by-step plan to his dental compressor. We have described the best product choice for you!
For which appliances and machines is this housing suitable?
The step-by-step plan for this sound-insulating housing is suitable for appliances and machines like compressors, jacuzzis, pool pumps, generators and more. This plan doesn't apply to heat pumps or outdoor air conditioning units. For these cases we would like to refer you to the tips page: “Insulating Outdoor Air Conditioning Units and Heat Pumps”.
Points of attention
To create a soundproof housing you need a construction plate, for example plywood, preferably as thick as possible. In order to insulate the housing, we recommend the following products:
- Soundproofing
In order to insulate noise, weight has to be added to the plywood. We recommend an Isomat variant of at least 14 kg/m², the available products are Isomat TS and Isomat KE. The following rule applies when it comes to sound insulation: mass = insulation. The heavier the Isomat, the higher the insulation value, the better the end result.
- Sound absorption
Sound absorption attenuates the sound inside of the housing, causing less noise to escape through ventilation openings or cracks. The two best and most economical options: Merfocell PU for appliances with an operating temperature of up to 80°C. Flamex FC for temperatures up to 150°C. For low-frequency noise, use a variant that is as thick as possible for optimal results.
- Vibration insulation
With a floating floor in the housing, the appliance is decoupled, reducing impact noise and vibrations. Depending on the appliance/machine, overall the best options are as follows. Appliances up to 100 kg: 4 to 6 parts of Regufoam of 100 x 100 x 25 mm, type D220. Appliances between 100 and 200 kg: 6 to 8 parts of Regufoam of 100 x 100 x 25 mm, type D300.
- Ventilation
For appliances that need a supply of fresh air or cooling, two openings are necessary: to supply and discharge. You can integrate acoustic ventilation into your design, about which you can read more on our tips page "Step-by-Step Plan for Acoustic Ventilation". You need to determine how much air your appliance needs.
- Glue for Isomat
Contact adhesive, for mounting Isomat.
Step-by-step plan for making the sound-insulating housing
As for making the housing, we have written a short step-by-step plan. When designing the housing, pay attention to the aforementioned points of attention.
-
Sheet material for the housing
In order to make the housing, use the thickest variant of MDF or plywood. Make the housing spacious enough, preferably a bit bigger than exactly to size. There is als space required for the insulation material, maintenance of the appliance, and ventilation. -
Ventilation
Assume that your appliance or machine needs ventilation or at least needs to be able to dissipate heat, inquire the manufacturer to find out more about the details. Below you can see a diagram of a DIY sound maze for the silent supply or removal of air. The sound maze contains baffles that create a labyrinth equipped with sound absorption material (Merfocell Burl is the most practical choice). Air and sound have to travel a long way along absorption material, making sure sound is 'filtered' out of the air.
The sound maze can be integrated in the housing. You have to determine the dimensions yourself. The advice is a flow space through the sound maze of at least 125 x 125 mm and at least four baffles. Adding a fan causes the sound maze to stimulate the flow of air, which is certainly recommended when applied to compressors. You can also put cables through the sound maze, rendering holes in the sound-insulating housing unnecessary.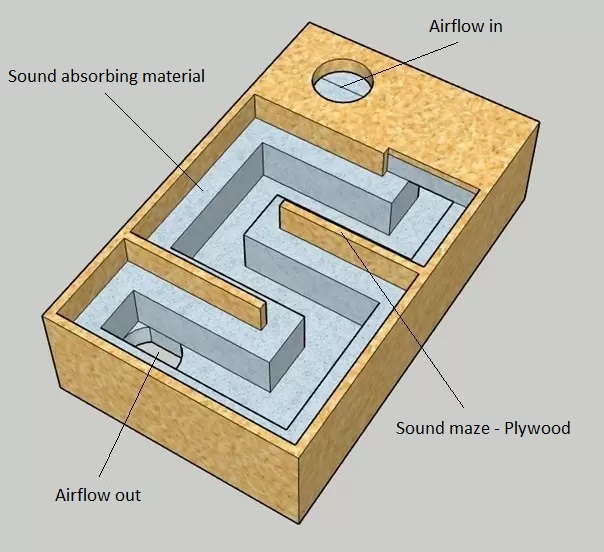
-
Apply sound absorption
Equip the entire housing on the inside with absorption material. We have pre-selected the best product for you: the thickest variant of Merfocell PU or Flamex FC. Like with the insulation mat: the thicker, the better. The difference in decibels may be as high as 5 dB, whereas the price difference is only a few Pounds. Apply the absorption material without seams. Both products are easy to cut to size with a knife, no glue needed since both sound absorbers are self-adhesive. -
Floating floor
Appliances that contain parts that move can cause the outside of the housing to vibrate, resulting in a big sound leak. By placing the appliance on a 'floating floor' this can be avoided. Place a Regufoam product under a sheet of plywood (or something similar), and put the housing over this floor, not top of it. The amount and type of Regufoam depends on the weight and type of appliance/machine. For most appliances and machine you can use the Regufoam Damper Pads. Keep in mind that the appliance needs to be stable, and that the floating floor is not allowed to touch the walls of the housing. If the appliance or machine is heavier than 100 kg, you better use Regufoam D300, this product is able to carry bigger loads, use at least 6 to 8 parts of 100 x 100 x 25 mm, Regufoam D300, SKU M0718.
The end result in practice
By applying this solution, depending on the source of the noise, a sound attenuation of no less than 20 decibels is feasible. Many customers perceive this as a reduction of at least 50% of the noise. This is quite a reduction, which is especially appreciated if you use the solution to reduce nuisance to neighbours or the surrounding environment. One of our customer has successfully applied this solutionon to his dental compressor. His satisfaction with the end result is reflected in his reaction:
Some time ago you gave me advise about how to insulate a dental compressor. In the meantime, I have placed the housing. The first photo shows the initial situation. The measured volume was 70 dB. The second photo shows the plywood sheets covered with Isomat KE. In order to allow for disassembling, I mounted the plates with wing nuts. The base plate is placed on Regufoam and the compressor on 2 concrete tiles of 30 x 30 cm. The third photo shows how the plates are set up. In the fourth photo they have been partly provided with Merfocell PU. The damper is placed on the left and on the right the fan (originally intended for bathroom venting). For easy accessibility, this plate can be removed quickly with so-called toggle latches.
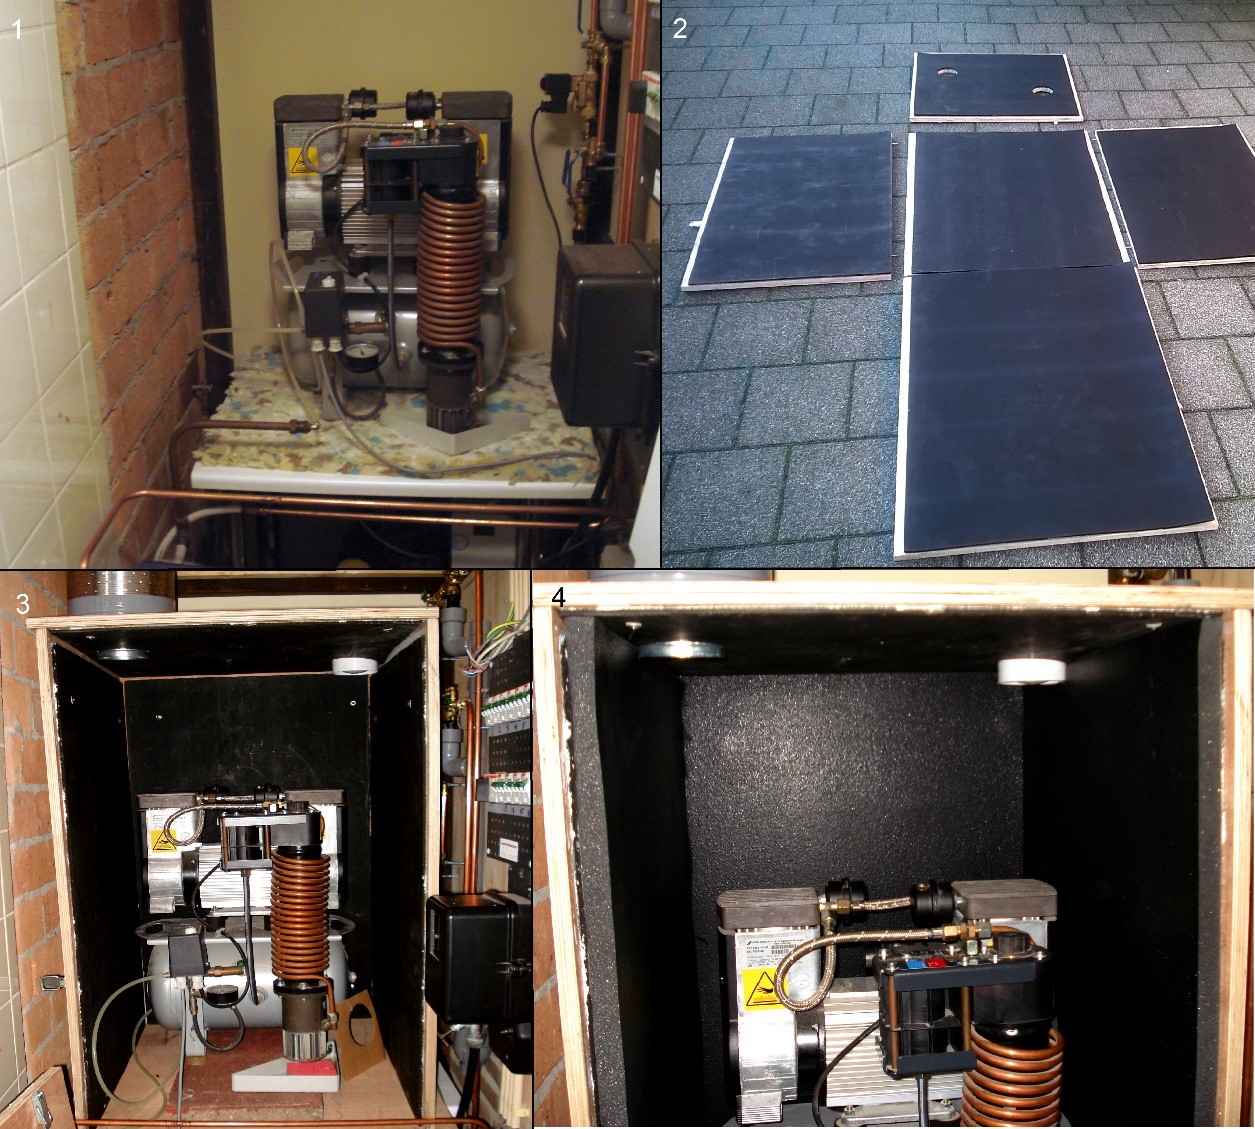
The noise level has been reduced to 50 dB The heat dissipation seems sufficient but needs to be further tested in hot weather. A damper for the intake seems unnecessary for the time being. Due to lack space, the housing has become slightly smaller than I intended. At first glance, the mission seems to have succeeded and I am satisfied with the achieved result.
Questions? 
Do you have any questions about this topic? Please feel free to contact us, we will be happy to answer your questions as soon as possible.